
Have you ever been captivated by the mesmerizing beauty of resin art but didn’t know how to start? Hello everyone, I’m Vicky .Welcome to my creative space! Whether you are new to resin art or have some experience, I’m here to share my creative journey and tips with you. Through detailed tutorials and easy-to-follow steps, I will guide you in exploring how to create stunning ocean scenes and vibrant abstract pieces. Let’s embark on this exciting creative journey together and transform ordinary materials into beautiful works of art!
Why Choose Resin Art?
Resin art has a unique sheen and endless creative possibilities, making it an increasingly popular art form. Whether creating dreamy ocean scenes or exquisite abstract paintings, resin art always adds charm to the finished piece. I fell in love with resin art because it opened up a new way of expression for me, bringing deep relaxation and fulfillment during the creation process.
Basic Tools and Materials
To start with resin art, you'll need several essential tools and materials. I detail how to use these tools effectively in my videos (10 tips for beginners to learn Resin art).
First and foremost, epoxy resin and hardener are crucial. Choosing high-quality epoxy resin ensures the clarity and durability of your project. You'll need to accurately measure the epoxy and hardener and mix them thoroughly to avoid bubbles and ensure proper curing. Next, you'll need a clean, flat base like a wooden board or canvas to serve as your creation's foundation. Creating resin art on these bases adds more structure and dimension to your work.
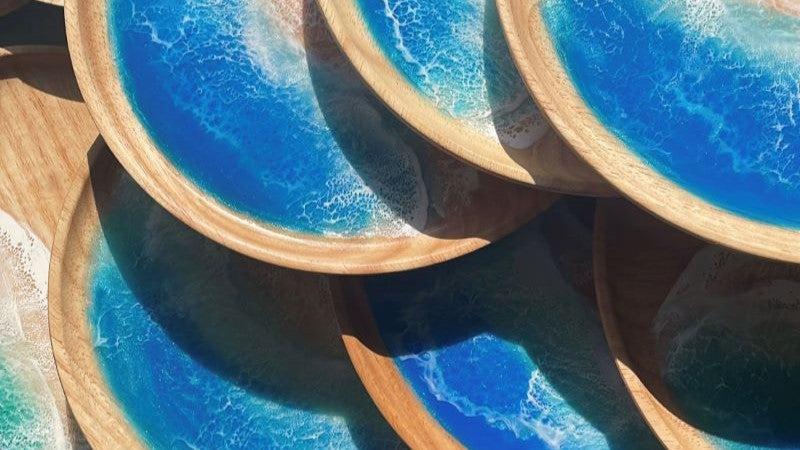
For pigments and powders, using resin-specific colors ensures vibrant color without affecting the curing of the resin. My videos show how to achieve stunning results with blue and white pigments to mimic realistic ocean waves. In addition to these supplies, keep handy stir sticks and measuring cups to help you precisely measure and mix the resin and hardener. As I've demonstrated in the videos, ensuring even mixing is vital for the final quality of the artwork.
Remember to wear protective gear, including disposable gloves and masks, to protect your skin and respiratory system and ensure your workspace is well-ventilated. This step is crucial because uncured epoxy resin can release volatile chemicals that should be avoided.
Creation Process
Before starting your project, prepare your workspace by setting up a clean, flat area covered with protective cloths to avoid resin spills. Wear your protective gear to ensure safety.
1. Mixing Epoxy Resin and Hardener
Mix epoxy resin and hardener according to the proper ratio using sticks. Ensure a thorough mix to avoid bubbles. Stir slowly to avoid creating too many bubbles, like I show you in the video.
2. Adding Pigments
Add specialized pigments or dyes to the mixed resin. Adjust the amount of pigment based on the desired effect. For example, in my video "Making Sea Art with Resin," I show how to use blue and white pigments to create realistic ocean waves.
3. Pouring and Creating Your Design
Pour the mixed and colored resin onto your prepared base, such as a canvas or wooden board. You can manipulate the resin’s flow and layering to create mesmerizing effects. In the video "DIY Resin Waves Wall Piece Tutorial," you can see how I use a spatula and heat gun to shape the waves and textures, producing lifelike and dynamic ocean scenes.
4. Incorporating Natural Elements
While the resin is still liquid, you can add natural elements like shells, sand, or dried flowers to enhance the depth and interest of your piece. I have shown how to perfectly integrate these elements into your work during their optimal stage.
5. Curing and Drying
Resin requires a period to cure, typically between 24 to 48 hours. Ensure your piece remains level and stable during this period and protect it from dust and debris. Patience here is critical, as it directly affects the quality of your finished artwork.
Tips and Common Questions In my creative journey, I often encounter beginner friends with several questions. Here are some common ones and their answers:
How to prevent bubbles?
Stir the resin and hardener slowly to reduce bubble formation. If bubbles appear, use a heat gun to eliminate them.
How much pigment should be added?
Typically, it is recommended that the pigment be no more than 10% of the total resin volume, as too much pigment may impact curing.
How do you store unused resin?
Store unused resin in a cool, dry place, well-sealed to prevent moisture and degradation, ensuring it remains in good condition for future use.
Final Touches and Displaying Your Work
After your project has fully cured, the first step is to enjoy the sense of achievement! You’ll be amazed at how your creations evolve and improve with practice and experimentation. If you're looking for ways to capture and share your work, here are some tips inspired by my videos:
1. High-Quality Photos and Videos
Use a high-resolution camera to capture your finished pieces. Opt for natural or soft artificial lighting to highlight the colors and depth of your resin art. In my video "Making Sea Art with Resin," you can see how I photograph and showcase my work.
2. Sharing Your Creation Process
Share your creation process and finished pieces on social media platforms like Instagram and Pinterest. Use popular hashtags such as #ResinArt and #FlourishCraft to increase exposure and attract fellow resin art enthusiasts and potential customers.